


![[noblocc] Kicked For Being AFK](https://everytalkin.com/wp-content/uploads/2024/02/noblocc-Kicked-For-Being-AFK-Strategies-in-Online-Gaming-1024x597.jpg)


Demystifying Front Panel Connectors: A Comprehensive Guide
Front panel connectors are a vital component of any computer system, facilitating the connection between your PC case and motherboard.
While they may seem daunting at first, understanding these connectors is crucial for assembling your own PC and ensuring everything runs smoothly.
In this comprehensive guide, we’ll delve deep into the world of front panel connectors, covering everything from the basics to advanced tips and tricks.
Understanding Front Panel Connectors: The Basics
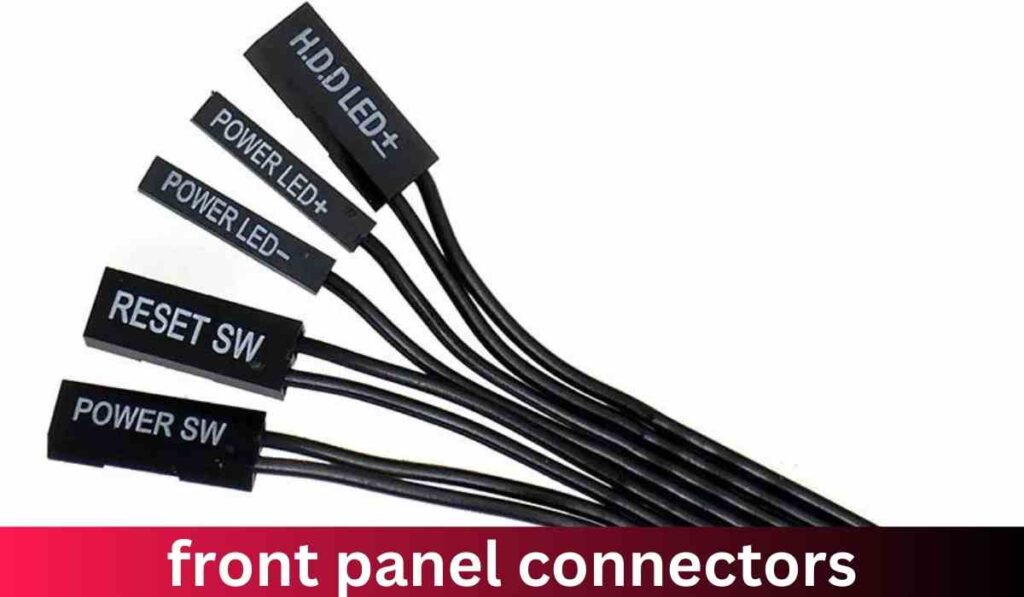
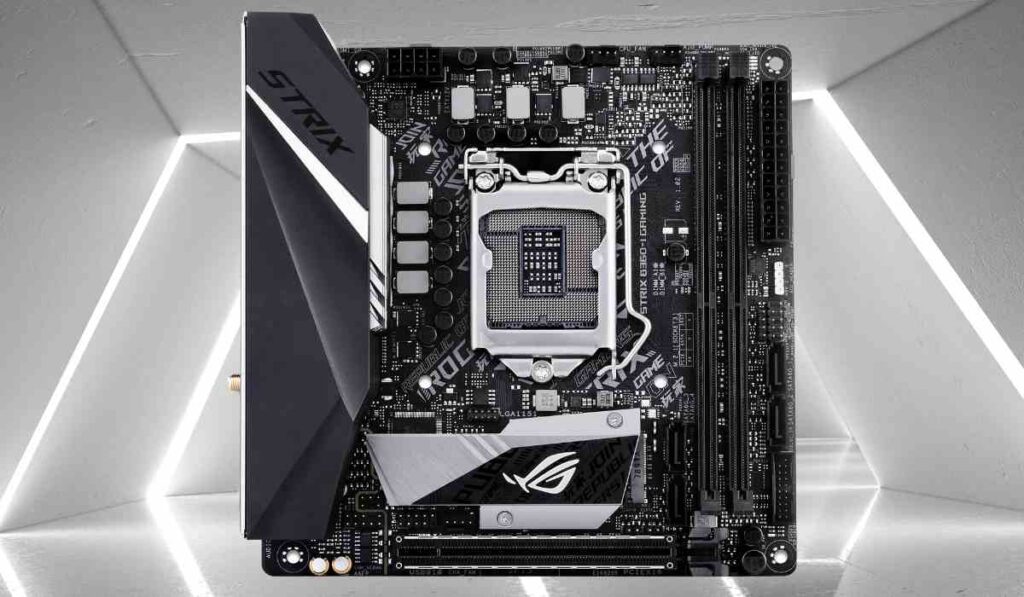
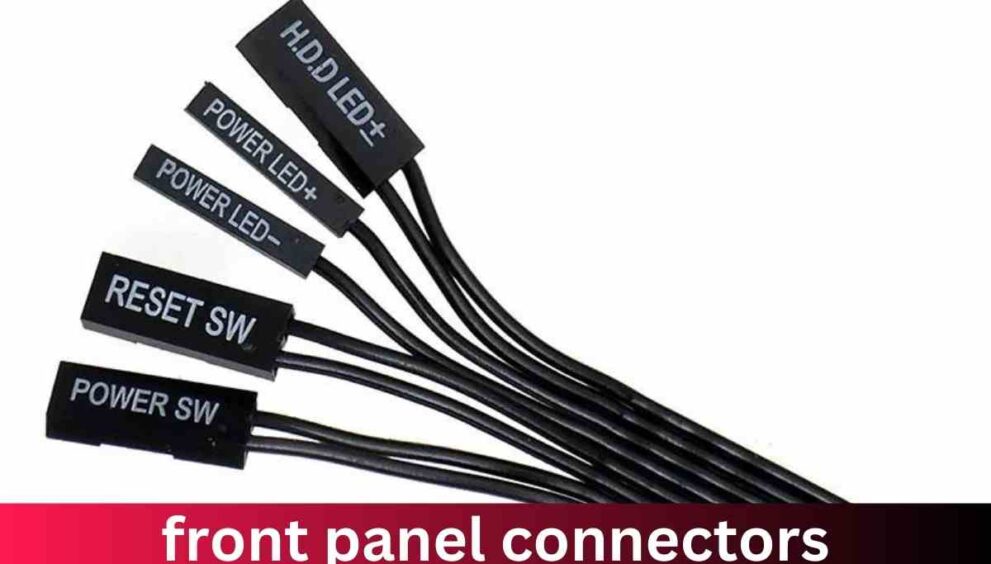
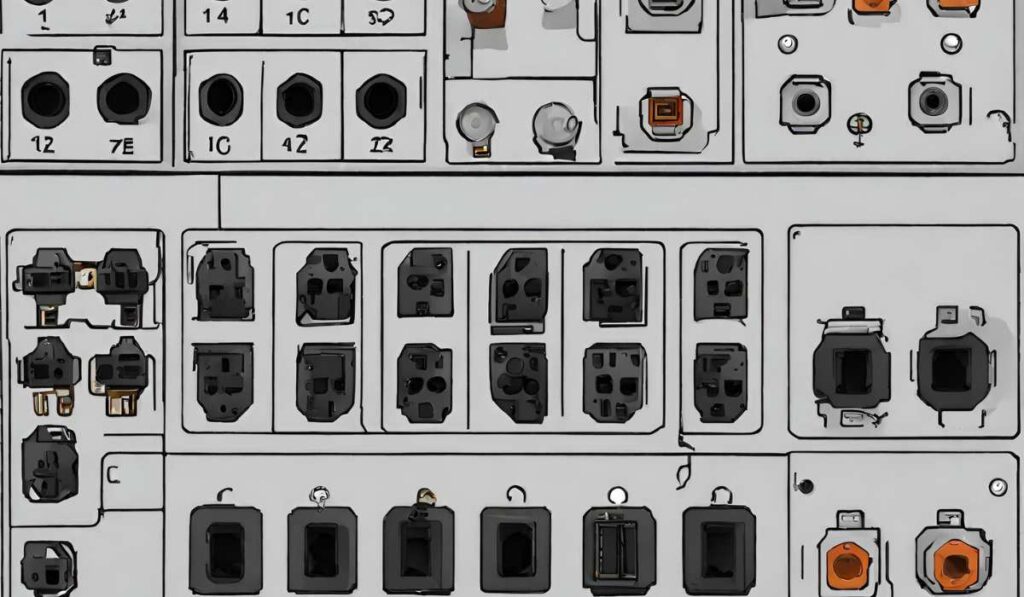
At the heart of every PC case lies a collection of buttons, LEDs, and ports on the front panel. These components, including the power button, reset button, power LED, HDD LED, USB ports, and audio jacks, allow users to interact with their computer system conveniently.
However, to make these front panel components functional, they need to be connected to the motherboard through front panel connectors.
Related Post: Where to connect audio on motherboard? | 2024
The Evolution of Front Panel Connectors
In the early days of PC building, front panel connectors varied significantly between different motherboard manufacturers and case vendors.
This lack of standardization often led to confusion and frustration among builders, as connecting front panel components required consulting complex motherboard manuals and deciphering cryptic labeling on case wires.
However, with the rise of industry standards, particularly the Intel front-panel header standard introduced in the late 1990s, the process of connecting front panel components has become more streamlined and intuitive.
The Intel standard, utilizing a nine-pin header layout, has since been adopted by most motherboard manufacturers, providing a common interface for connecting front panel components.
Decoding the Intel Front-Panel Header Standard
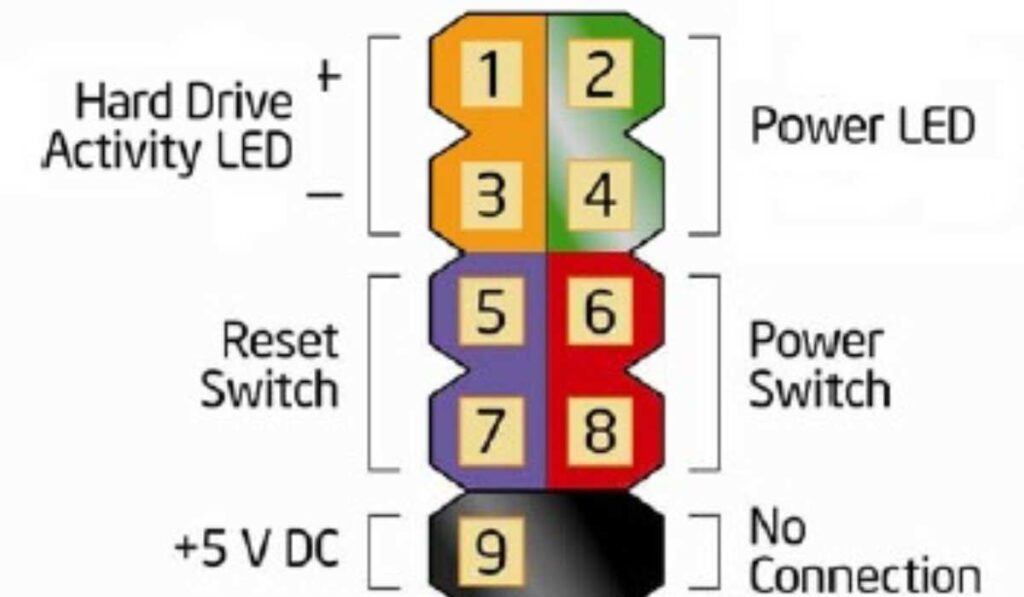
The Intel front-panel header standard is characterized by its nine-pin layout, with a key pin left out on the right side of the upper row.
This keying ensures proper orientation and prevents incorrect connections, making it easier for builders to connect front panel components without fear of damaging their hardware.
One of the notable features of the Intel standard is the adjacent placement of the Power LED positive and negative pins.
LEDs are polarized, meaning they only function when connected in the correct orientation. Additionally, power and reset buttons bridge their two pins, eliminating the need to worry about polarity during installation.
Legacy Support and Compatibility
While the Intel front-panel header standard has become the de facto standard for modern PC building, there are still cases where legacy compatibility is required.
Many older PC cases and motherboards may feature different pin layouts for front panel connectors, particularly the power LED, which historically had three-pin spacing on Baby AT motherboards.
To accommodate legacy connections, most front panel cables break into individual leads, with a split lead for the power LED.
Additionally, some builders may encounter single-lead “F_PANEL” cables, which simplify the connection process without requiring a breakout adapter.
Manufacturer Variations and Best Practices
While the Intel front-panel header standard provides a common interface for connecting front panel components, there are slight variations among motherboard manufacturers.
Brands like Asus, Gigabyte, ASRock, MSI, ECS, EVGA, Colorful, NZXT, and others adhere to the Intel standard but may include additional features or modifications to accommodate legacy support or unique design preferences.
For example, Asus was one of the first third-party manufacturers to support Intel’s front-panel header standard.
However, due to complaints from builders, Asus temporarily reverted to its non-standard front-panel header layout before reintroducing the Intel layout with extended support for legacy cables.
Similarly, Gigabyte uses the Intel standard for the left side of its connector but repurposes the no-contact pin for chassis intrusion detection.
ASRock, MSI, and other major players in the motherboard market also follow suit, ensuring widespread compatibility across various hardware configurations.
Navigating Biostar’s Unique Design
Biostar, while relatively less known compared to other motherboard manufacturers, made a significant transition to Intel’s header standard in 2020.
However, builders using Biostar motherboards may encounter unique challenges due to the design of their front-panel headers, particularly with older motherboard models still in circulation.
For instance, Biostar’s X570 motherboards were designed before the transition to Intel’s header standard, resulting in compatibility issues with newer front panel connectors.
Builders using Biostar motherboards may need to navigate unique connector designs, requiring careful attention during installation to avoid compatibility issues.
Related Post: AM4 vs AM5: Choosing the Right Socket for Your AMD Processor
Advanced Tips and Tricks for Front Panel Connector
While connecting front panel connectors may seem straightforward, there are several advanced tips and tricks that can help streamline the installation process and ensure optimal performance:
Labeling and Documentation
Before starting the installation process, carefully review the documentation provided with your motherboard and PC case.
Pay close attention to the labeling of front panel connectors and refer to any diagrams or instructions provided to ensure proper installation.
Organizing Cables
To avoid clutter and confusion, organize front panel cables neatly within your PC case. Use cable ties or cable management solutions to bundle cables together and keep them out of the way of airflow paths.
Testing and Troubleshooting
After connecting front panel connectors, perform thorough testing to ensure that all components function correctly.
Test each button, LED, and port individually to identify any potential issues and troubleshoot as needed.
Modular Front Panel Connectors
Some PC cases feature modular front panel connectors, allowing users to customize the layout and arrangement of front panel components. Take advantage of these features to tailor the front panel layout to your specific needs and preferences.
Upgrading Front Panel Components
As technology advances, you may wish to upgrade your front panel components to take advantage of new features or functionalities.
When upgrading front panel components, ensure compatibility with your motherboard and follow manufacturer guidelines for installation.
Beyond Front Panel Connectors: USB and Audio Connections
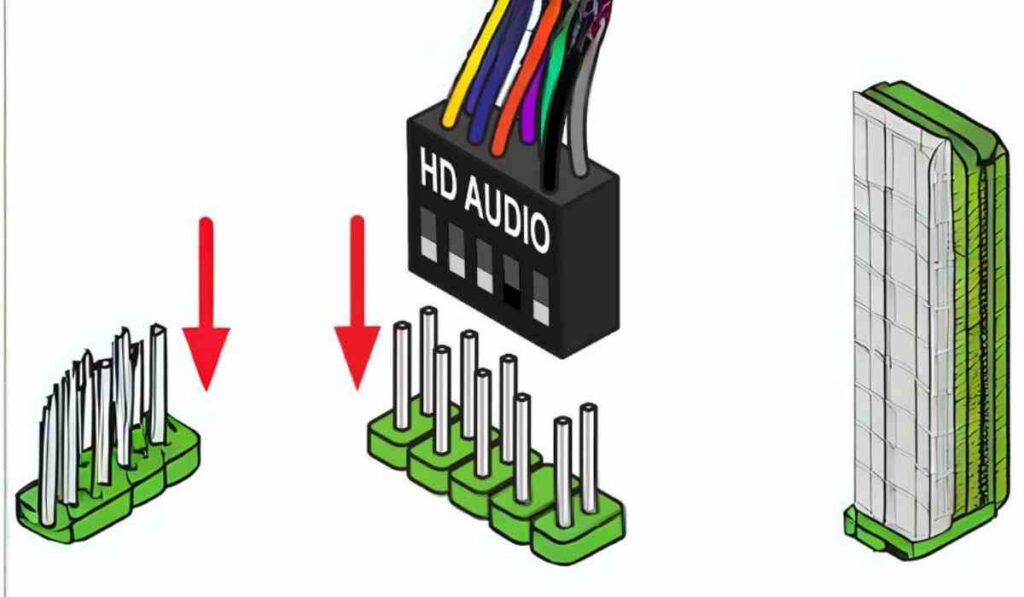
In addition to front panel connectors, modern PC cases feature standardized connections for USB ports and audio jacks.
These connections, including USB 2.0, USB 3.x, and HD-Audio, provide essential connectivity for peripherals and audio devices, enhancing the overall functionality of your PC.
USB ports and audio jacks are typically located on the front panel of the PC case, allowing for easy access to external devices such as keyboards, mice, headphones, and USB drives.
These connections are standardized to ensure compatibility with a wide range of devices and peripherals, making it easy to connect and use your favorite accessories with your PC.
Understanding USB Standards
USB (Universal Serial Bus) is a ubiquitous standard for connecting peripherals and external devices to computers.
Over the years, USB technology has evolved, with newer versions offering faster data transfer speeds and improved functionality.
Understanding USB standards is essential for ensuring compatibility with your PC’s front panel connectors and peripheral devices.
The current USB standard, USB 3.x, encompasses a range of specifications, including USB 3.0, USB 3.1, and USB 3.2.
These specifications define the capabilities and features of USB connections, including data transfer speeds, power delivery, and connector types.
USB 3.x connectors are characterized by their blue color and are backward compatible with USB 2.0 devices.
The latest USB 3.2 standard offers even faster data transfer speeds, with variants such as USB 3.2 Gen 1, USB 3.2 Gen 2, and USB 3.2 Gen 2×2 supporting data transfer rates of up to 20Gbps.
Navigating USB Connections
When connecting USB devices to your PC’s front panel connectors, it’s essential to ensure proper orientation and alignment to avoid damage to the connectors or devices.
USB connectors feature a standardized shape and orientation, with keying mechanisms to prevent incorrect insertion.
USB cables are typically labeled with the USB logo and connector type, making it easy to identify and connect devices correctly.
When connecting USB cables to your PC’s front panel connectors, align the connectors carefully and apply gentle pressure to ensure a secure connection.
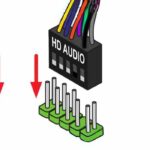
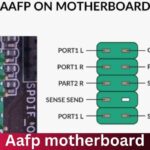
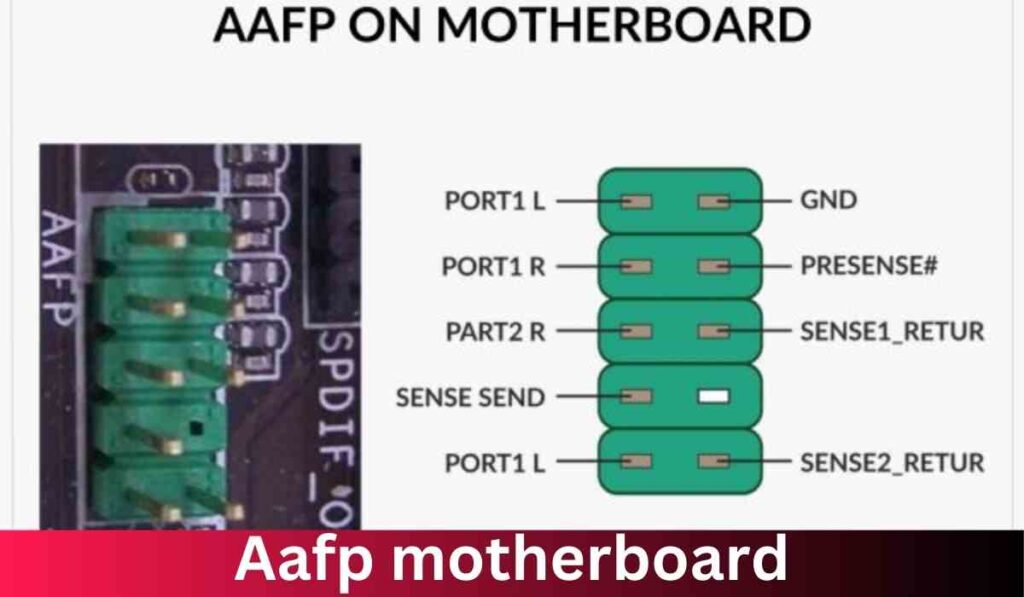
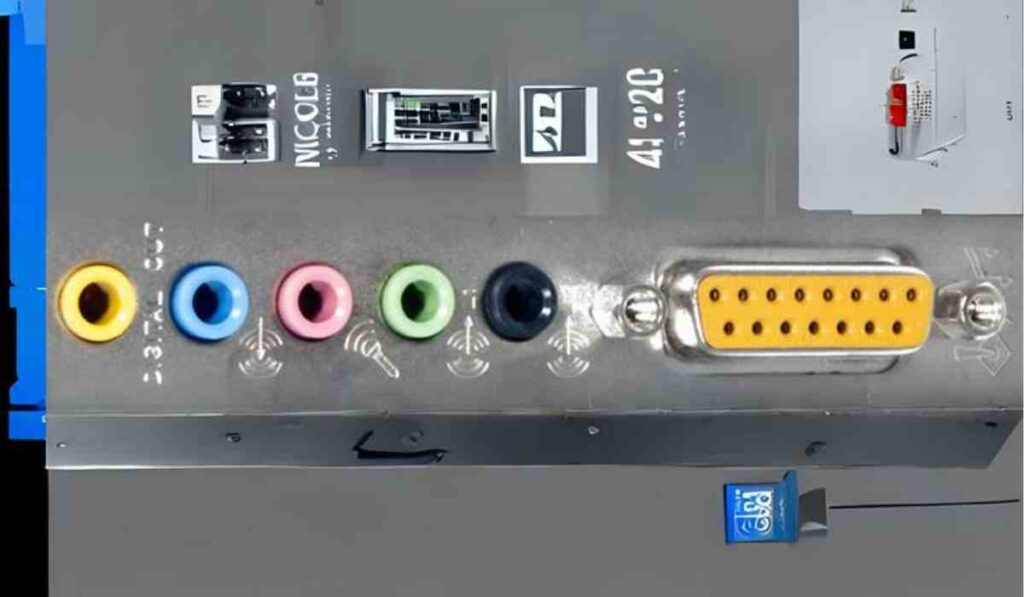
HD-Audio Connections
In addition to USB ports, modern PC cases also feature audio jacks for connecting headphones, microphones, speakers, and other audio devices.
These audio jacks are standardized as part of the HD-Audio specification, ensuring compatibility with a wide range of audio devices and peripherals.
HD-Audio connectors are typically color-coded for easy identification, with green indicating the audio output (headphones or speakers) and pink indicating the audio input (microphone).
When connecting audio devices to your PC’s front panel connectors, ensure proper alignment and orientation to avoid damage to the connectors or devices.
TL;DR: Making Sense of Front Panel Connectors
Front panel connectors play a crucial role in PC assembly, providing the interface between your PC case and motherboard.
Understanding industry standards like the Intel front-panel header standard is essential for ensuring compatibility and proper installation of front panel components.
By following best practices and utilizing advanced tips and tricks, you can streamline the installation process and optimize the functionality of your PC’s front panel connectors.
Additionally, understanding USB and audio connections can further enhance the versatility and usability of your PC, allowing you to connect a wide range of peripherals and devices with ease.
In conclusion, front panel connectors are an integral part of PC building, connecting essential components such as power buttons, LEDs, USB ports, and audio jacks to the motherboard.
With a solid understanding of front panel connectors and industry standards, you can build a high-performance PC that meets your needs and preferences.
FAQs
What are front panel connectors?
Front panel connectors are ports located on the front of your computer case that allow you to connect various peripherals and devices, such as USB ports, audio jacks, and power buttons, to your motherboard.
Why are front panel connectors important?
Front panel connectors provide convenient access to essential functions and peripherals, allowing users to interact with their computer system easily.
What is the Intel front-panel header standard?
The Intel front-panel header standard is a widely adopted industry standard for connecting front panel components to motherboards. It utilizes a nine-pin header layout, ensuring compatibility and ease of use.
How do I connect front panel connectors to my motherboard?
Refer to your motherboard’s user manual for specific instructions on connecting front panel connectors. Typically, you’ll match the labels on the connectors with the corresponding pins on the motherboard’s front panel header.
What is the purpose of the Power LED on the front panel?
The Power LED indicates whether your computer is powered on or in standby mode. It lights up when the computer is powered on and remains off when the computer is turned off.
What should I do if I encounter compatibility issues with front panel connectors?
If you encounter compatibility issues with front panel connectors, such as mismatched pin layouts between your case and motherboard, consider using adapter cables or consulting with your motherboard manufacturer for assistance.
Can I customize the layout of my front panel connectors?
Some PC cases feature modular front panel connectors, allowing users to customize the layout and arrangement of front panel components to suit their preferences. Check your case’s specifications for compatibility with modular connectors.
What precautions should I take when connecting front panel connectors?
When connecting front panel connectors, handle them carefully to avoid bending or damaging the pins. Ensure proper alignment and orientation before inserting the connectors into the motherboard’s front panel header.
Are front panel connectors compatible with all motherboards?
Front panel connectors designed according to industry standards, such as the Intel front-panel header standard, are compatible with most modern motherboards. However, it’s essential to verify compatibility with your specific motherboard model.
What do I do if my front panel connectors ar#en’t working?
If your front panel connectors aren’t working, double-check the connections to ensure they are correctly seated and aligned. If issues persist, consult your motherboard’s user manual or contact technical support for assistance.